
This was pretty annoying. I had more or less put my door back together following my speaker upgrade, all I was waiting for was some replacement clips I’d ordered to arrive and it would be done. I went out to my car to take a trip to the shops and discovered that someone had deprived me of the driver’s side wing mirror! I’ll never know who did it unfortunately. I made a temporary repair with some cable ties and an old sock believe it or not. I decided to repair it properly myself using parts from eBay. This article describes the procedure.
Tools and equipment
- Replacement Wing Mirror/Housing/Glass as required
- Torx Set
- Screwdrivers
- Car Trim Removal Set
- Car Trim Adhesive
Wing mirror description
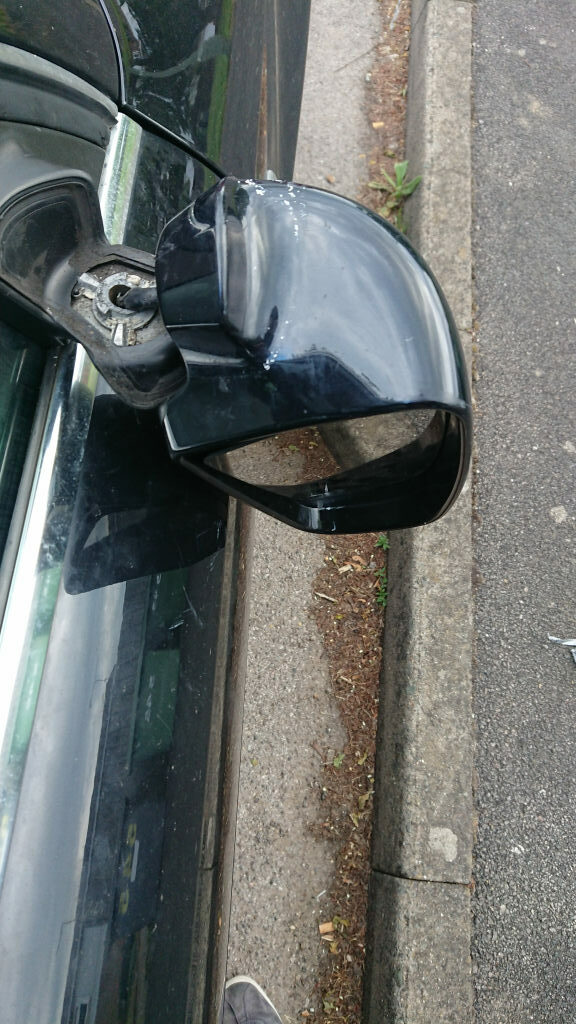
The wing mirrors on the model of car is located in the front corner of the window frame. There are a few different versions of the wing mirror so make sure you are buying the correct one. Mine is power folding, electrically adjustable and heated. Some of these features may be optional extras. The first time I didn’t check properly and ordered one without the power folding option, so make sure you are getting the right one.
If you end up with a damaged wing mirror it may be possible to repair it instead of a complete replacement. The glass itself and the painted cover are replaceable without removing the entire mirror. In my case the wing mirror had fractured at the bracket and needed to be completely replaced. I actually bought one of a different colour because my cover was in good condition. It can be swapped over quite easily.
If the entire mirror needs to be replaced then the correct way to do this is to remove the entire window frame, as the cable routing goes inside the window frame before going inside the door and connecting to a socket in the centre of the door. If you have sufficient wiring skills then you can avoid having to dismantle the door by clipping the cable and reattaching the individual wires inside the mirror. With the non-power folding mirrors (5 wires) this may be more feasible but my version has 10 wires and very little give, so I decided this was too fiddly for me.
Getting started
First remove the door card. Before disconnecting the cables look out for the socket for the wing mirror; this is a good time to plug in the replacement to check the replacement mirror’s electrical features are working.
Replacement procedure
This is the video I used to guide me through the procedure:
With the door card already off and disconnected, you can remove the speakers, window regulator, speaker, and window position sensor. Carefully remove the foam card. I didn’t worry to much about the old glue as I was going to use new glue when putting it back together. Just don’t use anything too permanent for this in case a window regulator etc needs to be replaced in the future.
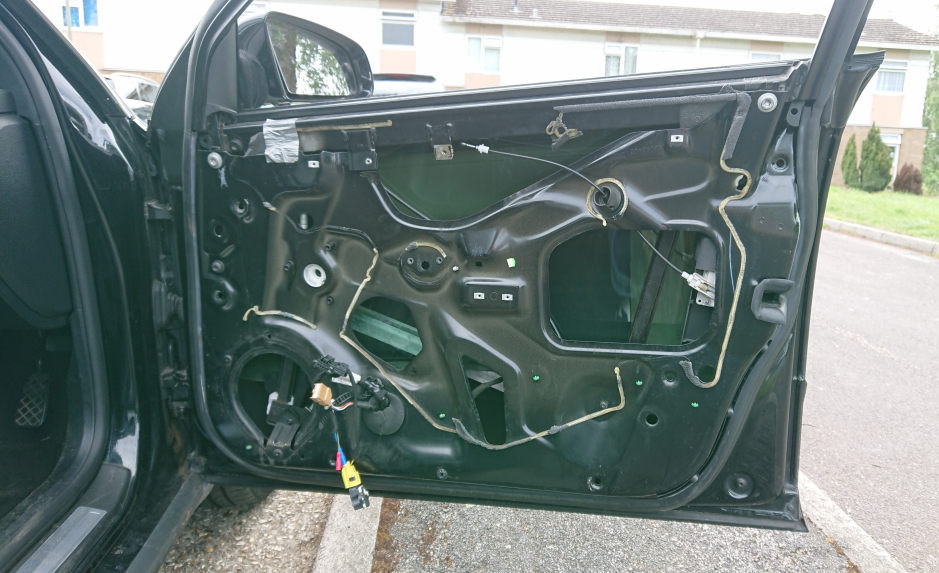
Remove the torx bolts (positions shown in video) and the rubber water protector and the window can then be lifted out of the door. Take note of the route of the wing mirror cable for putting it back together again.

With the window removed you can now remove the wing mirror and cable. There is a single torx bolt holding the mirror in place. Take note of how it all goes back together. You can see that the cable is routed through the window frame, so tie or stick this back in place when refitting.
Putting it back together
This is where it is best to get someone to help. The window is fairly heavy and needs to be guided back into position including various internal components with the rubber strip on the outside. You don’t want to be stuck on your own holding a heavy window with something snagged! Once its back in position check the cable routing is good and clear of the window guides. Then you can screw everything back into place, which is the reverse of detaching. Before attaching the door card ensure all the electrical functions are working and don’t forget to reattach the door handle cable!
In conclusion
This procedure took me a couple of hours work. In the end it wasn’t overly complicated; with no special tools required, this could be attempted by even a novice. The replacement part obtained on eBay was cheaper than a garage would have charged just to complete the work, so why not save yourself a bit of money and enjoy the satisfaction of carrying out your own repairs.